601 lines
30 KiB
Markdown
601 lines
30 KiB
Markdown
# 精尽 Spring Boot 源码解析 —— Jar 启动实现
|
||
|
||
# 1. 概述
|
||
|
||
Spring Boot 提供了 Maven 插件 [`spring-boot-maven-plugin`](https://docs.spring.io/spring-boot/docs/current/reference/html/build-tool-plugins.html#build-tool-plugins-maven-plugin),可以方便的将 Spring Boot 项目打成 `jar` 包或者 `war` 包。
|
||
|
||
考虑到部署的便利性,我们绝大多数 99.99% 的场景下,我们会选择打成 `jar` 包。这样,我们就无需在部署项目的服务器上,配置相应的 Tomcat、Jetty 等 Servlet 容器。
|
||
|
||
那么,`jar` 包是如何运行,并启动 Spring Boot 项目的呢?这个就是本文的目的,一起弄懂 Spring Boot `jar` 包的**运行原理**。
|
||
|
||
下面,我们来打开一个 Spring Boot `jar` 包,看看其里面的结构。如下图所示,一共分成四部分:
|
||
|
||
[](http://www.iocoder.cn/images/Spring-Boot/2019-01-07/01.png)Spring Boot `jar` 包
|
||
|
||
- ① `META-INF` 目录:通过 `MANIFEST.MF` 文件提供 `jar` 包的**元数据**,声明了 `jar` 的启动类。
|
||
|
||
- ② `org` 目录:为 Spring Boot 提供的 [`spring-boot-loader`](https://github.com/spring-projects/spring-boot/blob/master/spring-boot-project/spring-boot-tools/spring-boot-loader/) 项目,它是 `java -jar` 启动 Spring Boot 项目的秘密所在,也是稍后我们将深入了解的部分。
|
||
|
||
> Spring Boot Loader provides the secret sauce that allows you to build a single jar file that can be launched using `java -jar`. Generally you will not need to use `spring-boot-loader` directly, but instead work with the [Gradle](https://github.com/spring-projects/spring-boot/blob/master/spring-boot-project/spring-boot-tools/spring-boot-gradle-plugin) or [Maven](https://github.com/spring-projects/spring-boot/blob/master/spring-boot-project/spring-boot-tools/spring-boot-maven-plugin) plugin.
|
||
|
||
- ③ `BOOT-INF/lib` 目录:我们 Spring Boot 项目中引入的**依赖**的 `jar` 包们。`spring-boot-loader` 项目很大的一个作用,就是**解决 `jar` 包里嵌套 `jar` 的情况**,如何加载到其中的类。
|
||
|
||
- ④ `BOOT-INF/classes` 目录:我们在 Spring Boot 项目中 Java 类所编译的 `.class`、配置文件等等。
|
||
|
||
先简单剧透下,`spring-boot-loader` 项目需要解决两个问题:
|
||
|
||
- 第一,如何引导执行我们创建的 Spring Boot 应用的启动类,例如上述图中的 Application 类。
|
||
- 第二,如何加载 `BOOT-INF/class` 目录下的类,以及 `BOOT-INF/lib` 目录下内嵌的 `jar` 包中的类。
|
||
|
||
下面,尾随艿艿,一起来抽丝剥茧!
|
||
|
||
# 2. MANIFEST.MF
|
||
|
||
我们来查看 `META-INF/MANIFEST.MF` 文件,里面的内容如下:
|
||
|
||
```
|
||
Manifest-Version: 1.0
|
||
Implementation-Title: lab-39-demo
|
||
Implementation-Version: 2.2.2.RELEASE
|
||
Start-Class: cn.iocoder.springboot.lab39.skywalkingdemo.Application
|
||
Spring-Boot-Classes: BOOT-INF/classes/
|
||
Spring-Boot-Lib: BOOT-INF/lib/
|
||
Build-Jdk-Spec: 1.8
|
||
Spring-Boot-Version: 2.2.2.RELEASE
|
||
Created-By: Maven Archiver 3.4.0
|
||
Main-Class: org.springframework.boot.loader.JarLauncher
|
||
```
|
||
|
||
它实际是一个 **Properties** 配置文件,每一行都是一个配置项目。重点来看看两个配置项:
|
||
|
||
- `Main-Class` 配置项:Java 规定的 `jar` 包的启动类,这里设置为 `spring-boot-loader` 项目的 [JarLauncher](https://github.com/spring-projects/spring-boot/blob/master/spring-boot-project/spring-boot-tools/spring-boot-loader/src/main/java/org/springframework/boot/loader/JarLauncher.java) 类,进行 Spring Boot 应用的启动。
|
||
- `Start-Class` 配置项:Spring Boot 规定的**主**启动类,这里设置为我们定义的 Application 类。
|
||
|
||
> 小知识补充:为什么会有 `Main-Class`/`Start-Class` 配置项呢?因为我们是通过 Spring Boot 提供的 Maven 插件 [`spring-boot-maven-plugin`](https://github.com/spring-projects/spring-boot/blob/master/spring-boot-project/spring-boot-tools/spring-boot-maven-plugin/) 进行打包,该插件将该配置项写入到 `MANIFEST.MF` 中,从而能让 `spring-boot-loader` 能够引导启动 Spring Boot 应用。
|
||
|
||
可能胖友会有疑惑,`Start-Class` 对应的 Application 类自带了 `#main(String[] args)` 方法,为什么我们不能直接运行会如何呢?我们来简单尝试一下哈,控制台执行如下:
|
||
|
||
```
|
||
$ java -classpath lab-39-demo-2.2.2.RELEASE.jar cn.iocoder.springboot.lab39.skywalkingdemo.Application
|
||
错误: 找不到或无法加载主类 cn.iocoder.springboot.lab39.skywalkingdemo.Application
|
||
```
|
||
|
||
直接找不到 Application 类,因为它在 `BOOT-INF/classes` 目录下,不符合 Java 默认的 `jar` 包的加载规则。因此,需要通过 JarLauncher 启动加载。
|
||
|
||
当然实际还有一个更重要的原因,Java 规定可执行器的 `jar` 包禁止嵌套其它 `jar` 包。但是我们可以看到 `BOOT-INF/lib` 目录下,实际有 Spring Boot 应用依赖的所有 `jar` 包。因此,`spring-boot-loader` 项目自定义实现了 ClassLoader 实现类 [LaunchedURLClassLoader](https://github.com/spring-projects/spring-boot/blob/master/spring-boot-project/spring-boot-tools/spring-boot-loader/src/main/java/org/springframework/boot/loader/LaunchedURLClassLoader.java),支持加载 `BOOT-INF/classes` 目录下的 `.class` 文件,以及 `BOOT-INF/lib` 目录下的 `jar` 包。
|
||
|
||
# 3. JarLauncher
|
||
|
||
[JarLauncher](https://github.com/spring-projects/spring-boot/blob/master/spring-boot-project/spring-boot-tools/spring-boot-loader/src/main/java/org/springframework/boot/loader/JarLauncher.java) 类是针对 Spring Boot `jar` 包的启动类,整体类图如下所示:
|
||
|
||
[](http://www.iocoder.cn/images/Spring-Boot/2019-01-07/11.png)JarLauncher 类图
|
||
|
||
> 友情提示:[WarLauncher](https://github.com/spring-projects/spring-boot/blob/master/spring-boot-project/spring-boot-tools/spring-boot-loader/src/main/java/org/springframework/boot/loader/WarLauncher.java) 类,是针对 Spring Boot `war` 包的启动类,后续胖友可以自己瞅瞅,差别并不大哈~
|
||
|
||
JarLauncher 的源码比较简单,如下图所示:
|
||
|
||
```
|
||
public class JarLauncher extends ExecutableArchiveLauncher {
|
||
|
||
static final String BOOT_INF_CLASSES = "BOOT-INF/classes/";
|
||
|
||
static final String BOOT_INF_LIB = "BOOT-INF/lib/";
|
||
|
||
public JarLauncher() {
|
||
}
|
||
|
||
protected JarLauncher(Archive archive) {
|
||
super(archive);
|
||
}
|
||
|
||
@Override
|
||
protected boolean isNestedArchive(Archive.Entry entry) {
|
||
if (entry.isDirectory()) {
|
||
return entry.getName().equals(BOOT_INF_CLASSES);
|
||
}
|
||
return entry.getName().startsWith(BOOT_INF_LIB);
|
||
}
|
||
|
||
public static void main(String[] args) throws Exception {
|
||
new JarLauncher().launch(args);
|
||
}
|
||
|
||
}
|
||
```
|
||
|
||
通过 `#main(String[] args)` 方法,创建 JarLauncher 对象,并调用其 `#launch(String[] args)` 方法进行启动。整体的启动逻辑,其实是由父类 [Launcher](https://github.com/spring-projects/spring-boot/blob/master/spring-boot-project/spring-boot-tools/spring-boot-loader/src/main/java/org/springframework/boot/loader/Launcher.java) 所提供,如下图所示:
|
||
|
||
[](http://www.iocoder.cn/images/Spring-Boot/2019-01-07/12.png)Launcher 启动过程
|
||
|
||
父类 Launcher 的 `#launch(String[] args)` 方法,代码如下:
|
||
|
||
```
|
||
// Launcher.java
|
||
|
||
protected void launch(String[] args) throws Exception {
|
||
// <1> 注册 URL 协议的处理器
|
||
JarFile.registerUrlProtocolHandler();
|
||
// <2> 创建类加载器
|
||
ClassLoader classLoader = createClassLoader(getClassPathArchives());
|
||
// <3> 执行启动类的 main 方法
|
||
launch(args, getMainClass(), classLoader);
|
||
}
|
||
```
|
||
|
||
- `<1>` 处,调用 JarFile 的 `#registerUrlProtocolHandler()` 方法,注册 Spring Boot 自定义的 [URLStreamHandler](https://github.com/openjdk-mirror/jdk7u-jdk/blob/master/src/share/classes/java/net/URLStreamHandler.java) 实现类,用于 `jar` 包的加载读取。
|
||
- `<2>` 处,调用自身的 `#createClassLoader(List<Archive> archives)` 方法,创建自定义的 [ClassLoader](https://github.com/openjdk-mirror/jdk7u-jdk/blob/master/src/share/classes/java/lang/ClassLoader.java) 实现类,用于从 `jar` 包中加载类。
|
||
- `<3>` 处,执行我们声明的 Spring Boot 启动类,进行 Spring Boot 应用的启动。
|
||
|
||
简单来说,就是整一个可以读取 `jar` 包中类的加载器,保证 `BOOT-INF/lib` 目录下的类和 `BOOT-classes` 内嵌的 `jar` 中的类能够被正常加载到,之后执行 Spring Boot 应用的启动。
|
||
|
||
下面,我们逐行代码来看看噢。即将代码多多,保持淡定,嘿嘿~
|
||
|
||
## 3.1 registerUrlProtocolHandler
|
||
|
||
> 友情提示:对应 `JarFile.registerUrlProtocolHandler();` 代码段,不要迷路。
|
||
|
||
[JarFile](https://github.com/spring-projects/spring-boot/blob/master/spring-boot-project/spring-boot-tools/spring-boot-loader/src/main/java/org/springframework/boot/loader/jar/JarFile.java) 是 [`java.util.jar.JarFile`](https://github.com/openjdk-mirror/jdk7u-jdk/blob/master/src/share/classes/java/util/jar/JarFile.java) 的子类,如下所示:
|
||
|
||
```
|
||
public class JarFile extends java.util.jar.JarFile {
|
||
|
||
// ... 省略其它代码
|
||
|
||
}
|
||
```
|
||
|
||
JarFile 主要增强支持对内嵌的 `jar` 包的获取。如下图所示:
|
||
|
||
[](http://www.iocoder.cn/images/Spring-Boot/2019-01-07/13.png)读取内嵌的 `jar` 包的演示
|
||
|
||
OK,介绍完之后,让我们回到 JarFile 的 `#registerUrlProtocolHandler()` 方法,注册 Spring Boot 自定义的 URL 协议的处理器。代码如下:
|
||
|
||
```
|
||
// JarFile.java
|
||
|
||
private static final String PROTOCOL_HANDLER = "java.protocol.handler.pkgs";
|
||
|
||
private static final String HANDLERS_PACKAGE = "org.springframework.boot.loader";
|
||
|
||
/**
|
||
* Register a {@literal 'java.protocol.handler.pkgs'} property so that a
|
||
* {@link URLStreamHandler} will be located to deal with jar URLs.
|
||
*/
|
||
public static void registerUrlProtocolHandler() {
|
||
// 获得 URLStreamHandler 的路径
|
||
String handlers = System.getProperty(PROTOCOL_HANDLER, "");
|
||
// 将 Spring Boot 自定义的 HANDLERS_PACKAGE(org.springframework.boot.loader) 补充上去
|
||
System.setProperty(PROTOCOL_HANDLER, ("".equals(handlers) ? HANDLERS_PACKAGE
|
||
: handlers + "|" + HANDLERS_PACKAGE));
|
||
// 重置已缓存的 URLStreamHandler 处理器们
|
||
resetCachedUrlHandlers();
|
||
}
|
||
|
||
/**
|
||
* Reset any cached handlers just in case a jar protocol has already been used.
|
||
* We reset the handler by trying to set a null {@link URLStreamHandlerFactory} which
|
||
* should have no effect other than clearing the handlers cache.
|
||
*
|
||
* 重置 URL 中的 URLStreamHandler 的缓存,防止 `jar://` 协议对应的 URLStreamHandler 已经创建
|
||
* 我们通过设置 URLStreamHandlerFactory 为 null 的方式,清空 URL 中的该缓存。
|
||
*/
|
||
private static void resetCachedUrlHandlers() {
|
||
try {
|
||
URL.setURLStreamHandlerFactory(null);
|
||
} catch (Error ex) {
|
||
// Ignore
|
||
}
|
||
}
|
||
```
|
||
|
||
- 胖友先跟着注释,自己阅读下如上的代码~
|
||
|
||
目的很明确,通过将 `org.springframework.boot.loader` 包设置到 `"java.protocol.handler.pkgs"` 环境变量,从而使用到自定义的 URLStreamHandler 实现类 [Handler](https://github.com/spring-projects/spring-boot/blob/master/spring-boot-project/spring-boot-tools/spring-boot-loader/src/main/java/org/springframework/boot/loader/jar/Handler.java),处理 `jar:` 协议的 URL。
|
||
|
||
> 友情提示:这里我们暂时不深入 Handler 的源码,避免直接走的太深,丢失了主干。后续胖友可结合[《Java URL 协议扩展实现》](https://www.iteye.com/blog/mercyblitz-735529)文章,进行 Handler 的实现理解。
|
||
>
|
||
> 另外,[HandlerTests](https://github.com/spring-projects/spring-boot/blob/master/spring-boot-project/spring-boot-tools/spring-boot-loader/src/test/java/org/springframework/boot/loader/jar/HandlerTests.java) 提供的单元测试,也是非常有帮助的~
|
||
|
||
## 3.2 createClassLoader
|
||
|
||
> 友情提示:对应 `ClassLoader classLoader = createClassLoader(getClassPathArchives())` 代码段,不要迷路。
|
||
|
||
### 3.2.1 getClassPathArchives
|
||
|
||
首先,我们先来看看 `#getClassPathArchives()` 方法,它是由 ExecutableArchiveLauncher 所实现,代码如下:
|
||
|
||
```
|
||
// ExecutableArchiveLauncher.java
|
||
|
||
private final Archive archive;
|
||
|
||
@Override
|
||
protected List<Archive> getClassPathArchives() throws Exception {
|
||
// <1> 获得所有 Archive
|
||
List<Archive> archives = new ArrayList<>(
|
||
this.archive.getNestedArchives(this::isNestedArchive));
|
||
// <2> 后续处理
|
||
postProcessClassPathArchives(archives);
|
||
return archives;
|
||
}
|
||
|
||
protected abstract boolean isNestedArchive(Archive.Entry entry);
|
||
|
||
protected void postProcessClassPathArchives(List<Archive> archives) throws Exception {
|
||
}
|
||
```
|
||
|
||
> 友情提示:这里我们会看到一个 [Archive](https://github.com/spring-projects/spring-boot/blob/master/spring-boot-project/spring-boot-tools/spring-boot-loader/src/main/java/org/springframework/boot/loader/archive/Archive.java) 对象,先可以暂时理解成一个一个的**档案**,稍后会清晰认识的~
|
||
|
||
`<1>` 处,`this::isNestedArchive` 代码段,创建了 [EntryFilter](https://github.com/spring-projects/spring-boot/blob/master/spring-boot-project/spring-boot-tools/spring-boot-loader/src/main/java/org/springframework/boot/loader/archive/Archive.java#L130-L143) 匿名实现类,用于过滤 `jar` 包不需要的目录。
|
||
|
||
```
|
||
// Archive.java
|
||
|
||
/**
|
||
* Represents a single entry in the archive.
|
||
*/
|
||
interface Entry {
|
||
|
||
/**
|
||
* Returns {@code true} if the entry represents a directory.
|
||
* @return if the entry is a directory
|
||
*/
|
||
boolean isDirectory();
|
||
|
||
/**
|
||
* Returns the name of the entry.
|
||
* @return the name of the entry
|
||
*/
|
||
String getName();
|
||
|
||
}
|
||
|
||
/**
|
||
* Strategy interface to filter {@link Entry Entries}.
|
||
*/
|
||
interface EntryFilter {
|
||
|
||
/**
|
||
* Apply the jar entry filter.
|
||
* @param entry the entry to filter
|
||
* @return {@code true} if the filter matches
|
||
*/
|
||
boolean matches(Entry entry);
|
||
|
||
}
|
||
```
|
||
|
||
这里在它的内部,调用了 `#isNestedArchive(Archive.Entry entry)` 方法,它是由 JarLauncher 所实现,代码如下:
|
||
|
||
```
|
||
// JarLauncher.java
|
||
|
||
static final String BOOT_INF_CLASSES = "BOOT-INF/classes/";
|
||
|
||
static final String BOOT_INF_LIB = "BOOT-INF/lib/";
|
||
|
||
@Override
|
||
protected boolean isNestedArchive(Archive.Entry entry) {
|
||
// 如果是目录的情况,只要 BOOT-INF/classes/ 目录
|
||
if (entry.isDirectory()) {
|
||
return entry.getName().equals(BOOT_INF_CLASSES);
|
||
}
|
||
// 如果是文件的情况,只要 BOOT-INF/lib/ 目录下的 `jar` 包
|
||
return entry.getName().startsWith(BOOT_INF_LIB);
|
||
}
|
||
```
|
||
|
||
- 目的就是过滤获得,`BOOT-INF/classes/` 目录下的类,以及 `BOOT-INF/lib/` 的内嵌 `jar` 包。
|
||
|
||
`<1>` 处,`this.archive.getNestedArchives` 代码段,调用 Archive 的 `#getNestedArchives(EntryFilter filter)` 方法,获得 `archive` 内嵌的 Archive 集合。代码如下:
|
||
|
||
```
|
||
// Archive.java
|
||
|
||
/**
|
||
* Returns nested {@link Archive}s for entries that match the specified filter.
|
||
* @param filter the filter used to limit entries
|
||
* @return nested archives
|
||
* @throws IOException if nested archives cannot be read
|
||
*/
|
||
List<Archive> getNestedArchives(EntryFilter filter) throws IOException;
|
||
```
|
||
|
||
[Archive](https://github.com/spring-projects/spring-boot/blob/master/spring-boot-project/spring-boot-tools/spring-boot-loader/src/main/java/org/springframework/boot/loader/archive/Archive.java) 接口,是 `spring-boot-loader` 项目定义的**档案**抽象,其子类如下图所示:
|
||
|
||
[](http://www.iocoder.cn/images/Spring-Boot/2019-01-07/14.png)Archive 类图
|
||
|
||
- ExplodedArchive 是针对**目录**的 Archive 实现类。
|
||
- JarFileArchive 是针对 **`jar` 包**的 Archive 实现类。
|
||
|
||
> 友情提示:这块可能有一丢丢复杂,胖友吃耐心哈~
|
||
|
||
那么,我们在 ExecutableArchiveLauncher 的 `archive` 属性是怎么来的呢?答案在 ExecutableArchiveLauncher 的构造方法中,代码如下:
|
||
|
||
```
|
||
// ExecutableArchiveLauncher.java
|
||
|
||
public abstract class ExecutableArchiveLauncher extends Launcher {
|
||
|
||
private final Archive archive;
|
||
|
||
public ExecutableArchiveLauncher() {
|
||
try {
|
||
this.archive = createArchive();
|
||
} catch (Exception ex) {
|
||
throw new IllegalStateException(ex);
|
||
}
|
||
}
|
||
|
||
protected ExecutableArchiveLauncher(Archive archive) {
|
||
this.archive = archive;
|
||
}
|
||
|
||
// ... 省略其它
|
||
}
|
||
|
||
// Launcher.java
|
||
public abstract class Launcher {
|
||
|
||
protected final Archive createArchive() throws Exception {
|
||
// 获得 jar 所在的绝对路径
|
||
ProtectionDomain protectionDomain = getClass().getProtectionDomain();
|
||
CodeSource codeSource = protectionDomain.getCodeSource();
|
||
URI location = (codeSource != null) ? codeSource.getLocation().toURI() : null;
|
||
String path = (location != null) ? location.getSchemeSpecificPart() : null;
|
||
if (path == null) {
|
||
throw new IllegalStateException("Unable to determine code source archive");
|
||
}
|
||
File root = new File(path);
|
||
if (!root.exists()) {
|
||
throw new IllegalStateException(
|
||
"Unable to determine code source archive from " + root);
|
||
}
|
||
// 如果是目录,则使用 ExplodedArchive 进行展开
|
||
// 如果不是目录,则使用 JarFileArchive
|
||
return (root.isDirectory() ? new ExplodedArchive(root)
|
||
: new JarFileArchive(root));
|
||
}
|
||
|
||
}
|
||
```
|
||
|
||
根据根路径**是否为目录**的情况,创建 ExplodedArchive 或 JarFileArchive 对象。那么问题就来了,这里的 `root` 是什么呢?艿艿一波骚操作,终于输出了答案,如下图所示:
|
||
|
||
[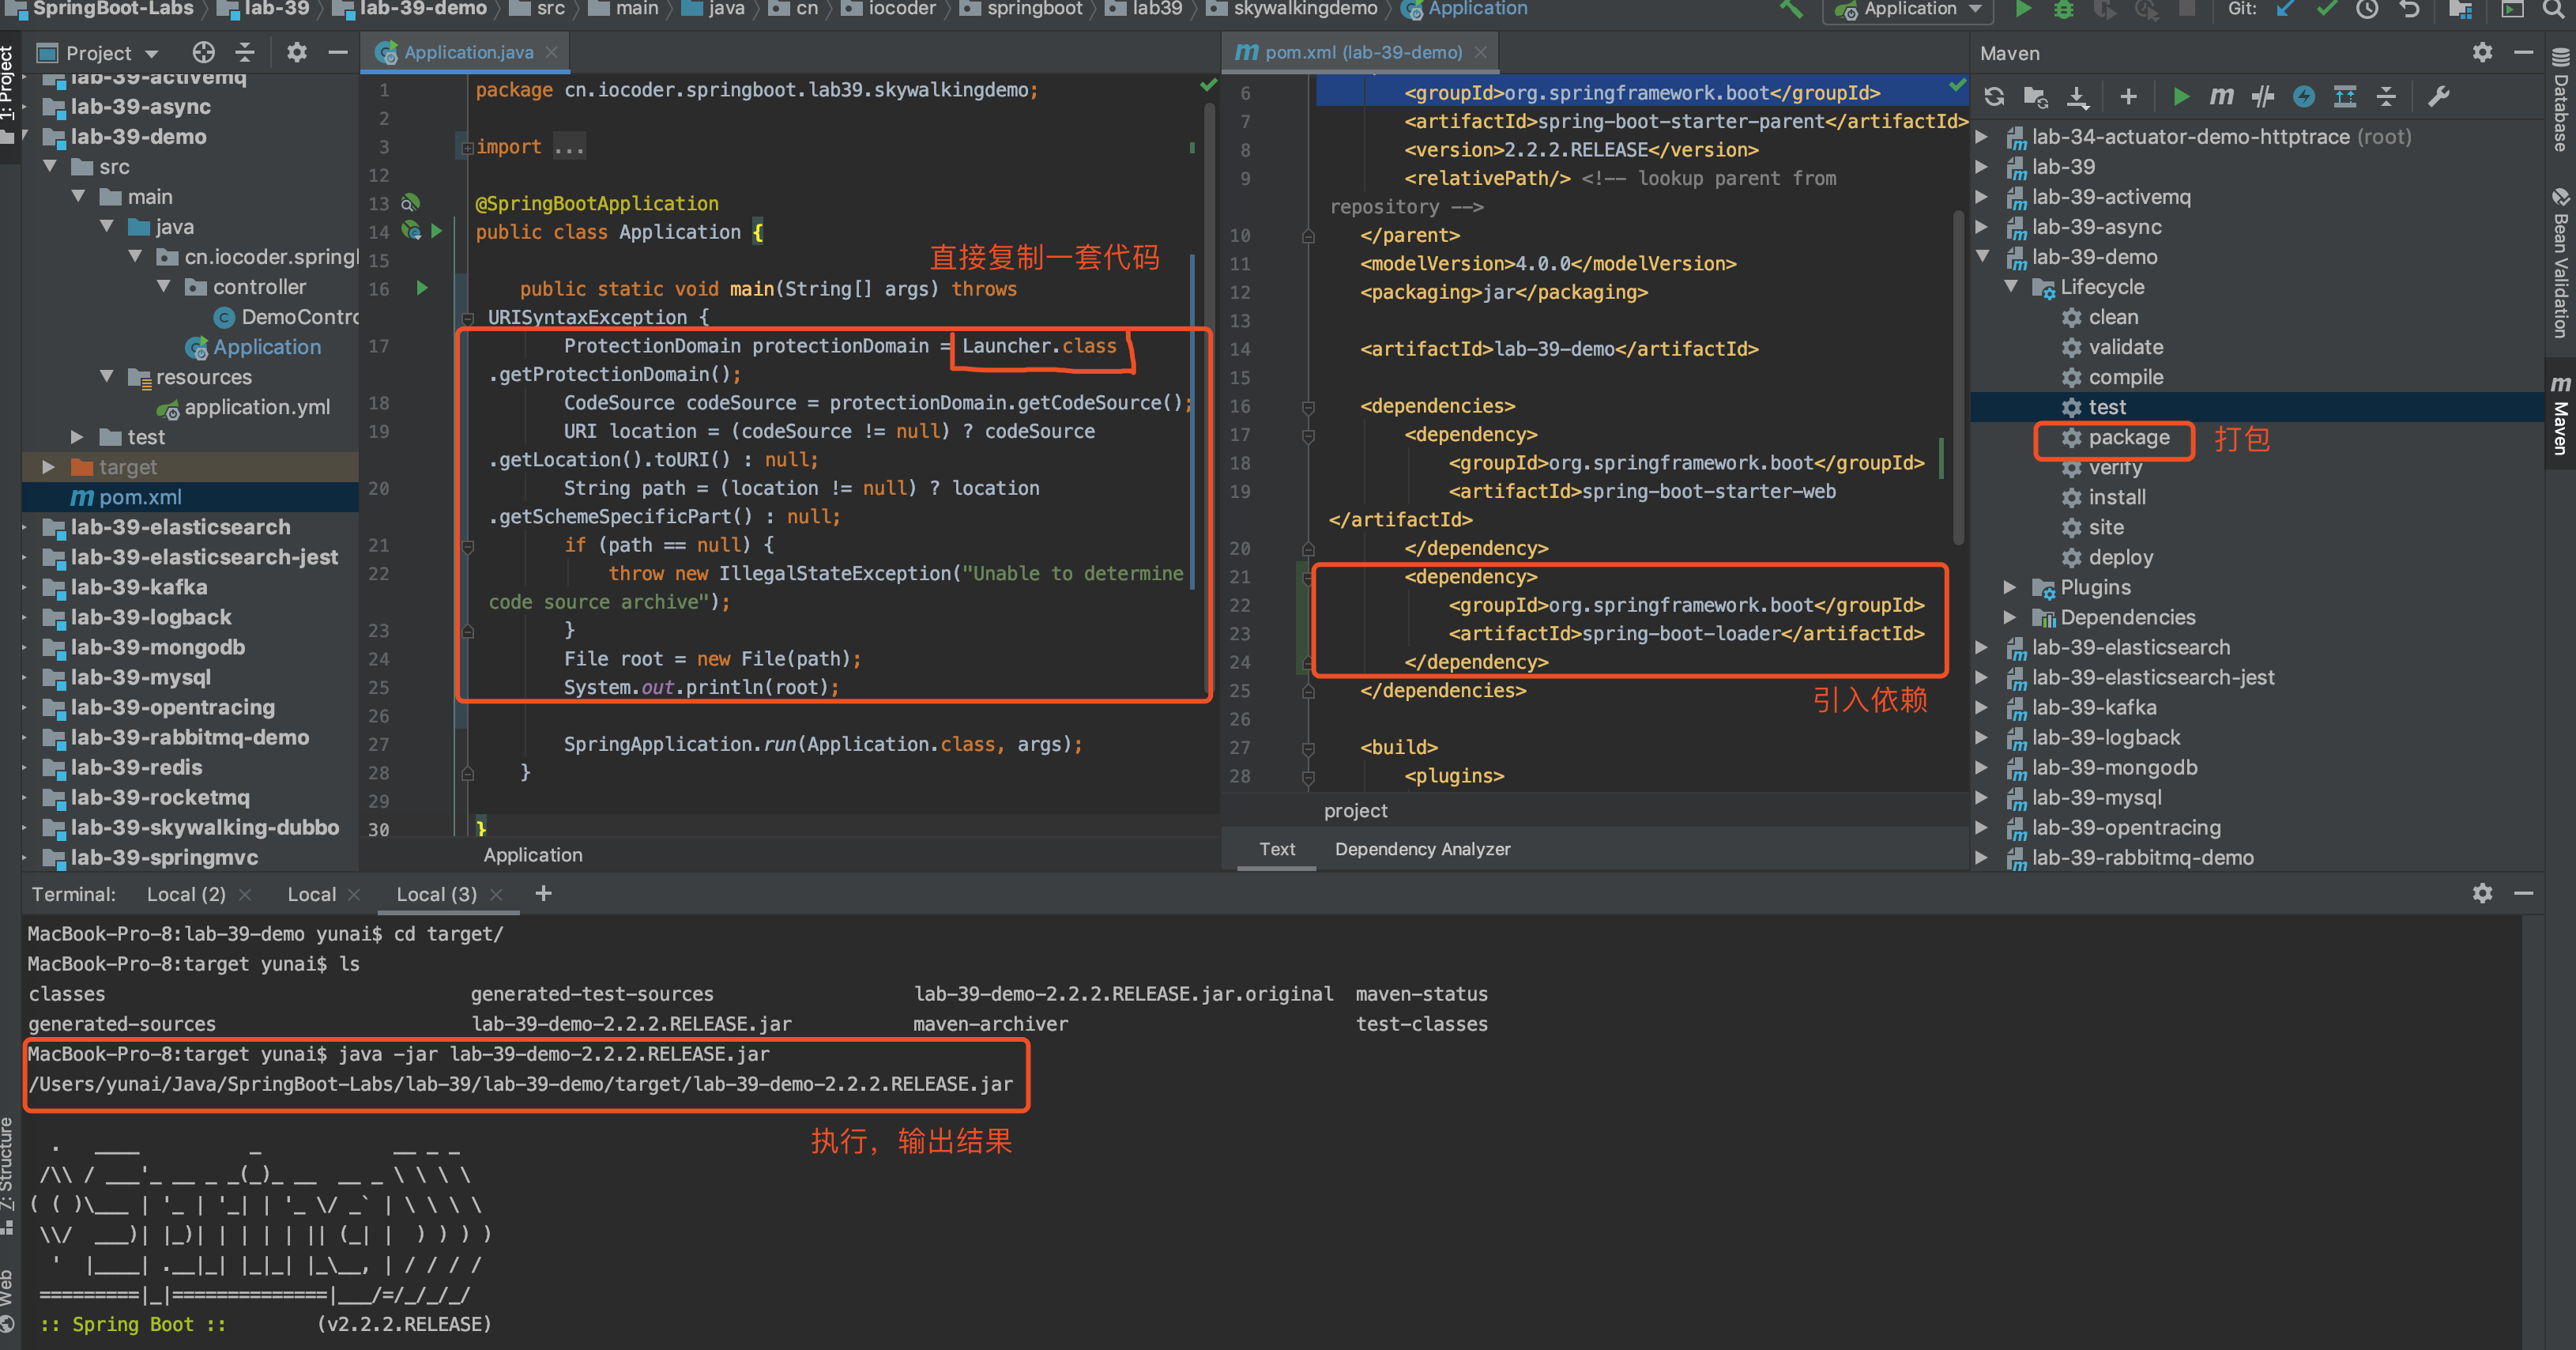](http://www.iocoder.cn/images/Spring-Boot/2019-01-07/15.png)`root` 是什么!
|
||
|
||
`root` 路径为 `jar` 包的绝对地址,也就是说创建 JarFileArchive 对象。原因是,Launcher 所在包为 `org` 下,它的根目录当然是 `jar` 包的绝对路径哈!
|
||
|
||
😈 现在是不是对 Archive 稍微有点感觉落?继续附加如下代码,打印 JarFileArchive 的 `#getNestedArchives(EntryFilter filter)` 方法的执行结果。
|
||
|
||
```
|
||
// ========== 附加代码:
|
||
// 创建 Archive 对象
|
||
Archive archive = new JarFileArchive(root);
|
||
// 创建 EntryFilter 对象
|
||
Archive.EntryFilter filter = new Archive.EntryFilter() {
|
||
|
||
static final String BOOT_INF_CLASSES = "BOOT-INF/classes/";
|
||
|
||
static final String BOOT_INF_LIB = "BOOT-INF/lib/";
|
||
|
||
@Override
|
||
public boolean matches(Archive.Entry entry) {
|
||
// 如果是目录的情况,只要 BOOT-INF/classes/ 目录
|
||
if (entry.isDirectory()) {
|
||
return entry.getName().equals(BOOT_INF_CLASSES);
|
||
}
|
||
// 如果是文件的情况,只要 BOOT-INF/lib/ 目录下的 `jar` 包
|
||
return entry.getName().startsWith(BOOT_INF_LIB);
|
||
}
|
||
|
||
};
|
||
// 执行读取
|
||
for (Archive item : archive.getNestedArchives(filter)) {
|
||
System.out.println(item.getUrl());
|
||
}
|
||
|
||
// ========== 执行结果:
|
||
jar:file:/Users/yunai/Java/SpringBoot-Labs/lab-39/lab-39-demo/target/lab-39-demo-2.2.2.RELEASE.jar!/BOOT-INF/classes!/
|
||
jar:file:/Users/yunai/Java/SpringBoot-Labs/lab-39/lab-39-demo/target/lab-39-demo-2.2.2.RELEASE.jar!/BOOT-INF/lib/spring-boot-starter-web-2.2.2.RELEASE.jar!/
|
||
jar:file:/Users/yunai/Java/SpringBoot-Labs/lab-39/lab-39-demo/target/lab-39-demo-2.2.2.RELEASE.jar!/BOOT-INF/lib/spring-boot-starter-2.2.2.RELEASE.jar!/
|
||
jar:file:/Users/yunai/Java/SpringBoot-Labs/lab-39/lab-39-demo/target/lab-39-demo-2.2.2.RELEASE.jar!/BOOT-INF/lib/spring-boot-2.2.2.RELEASE.jar!/
|
||
... 省略其他 jar 包
|
||
```
|
||
|
||
从执行结果可以看出,`BOOT-INF/classes/` 目录被归类为**一个** Archive 对象,而 `BOOT-INF/lib/` 目录下的**每个**内嵌 `jar` 包都对应**一个** Archive 对象。
|
||
|
||
来来来,回过头来看看 JarFileArchive 的 `#getNestedArchives(EntryFilter filter)` 方法的源码,如下图所示:
|
||
|
||
[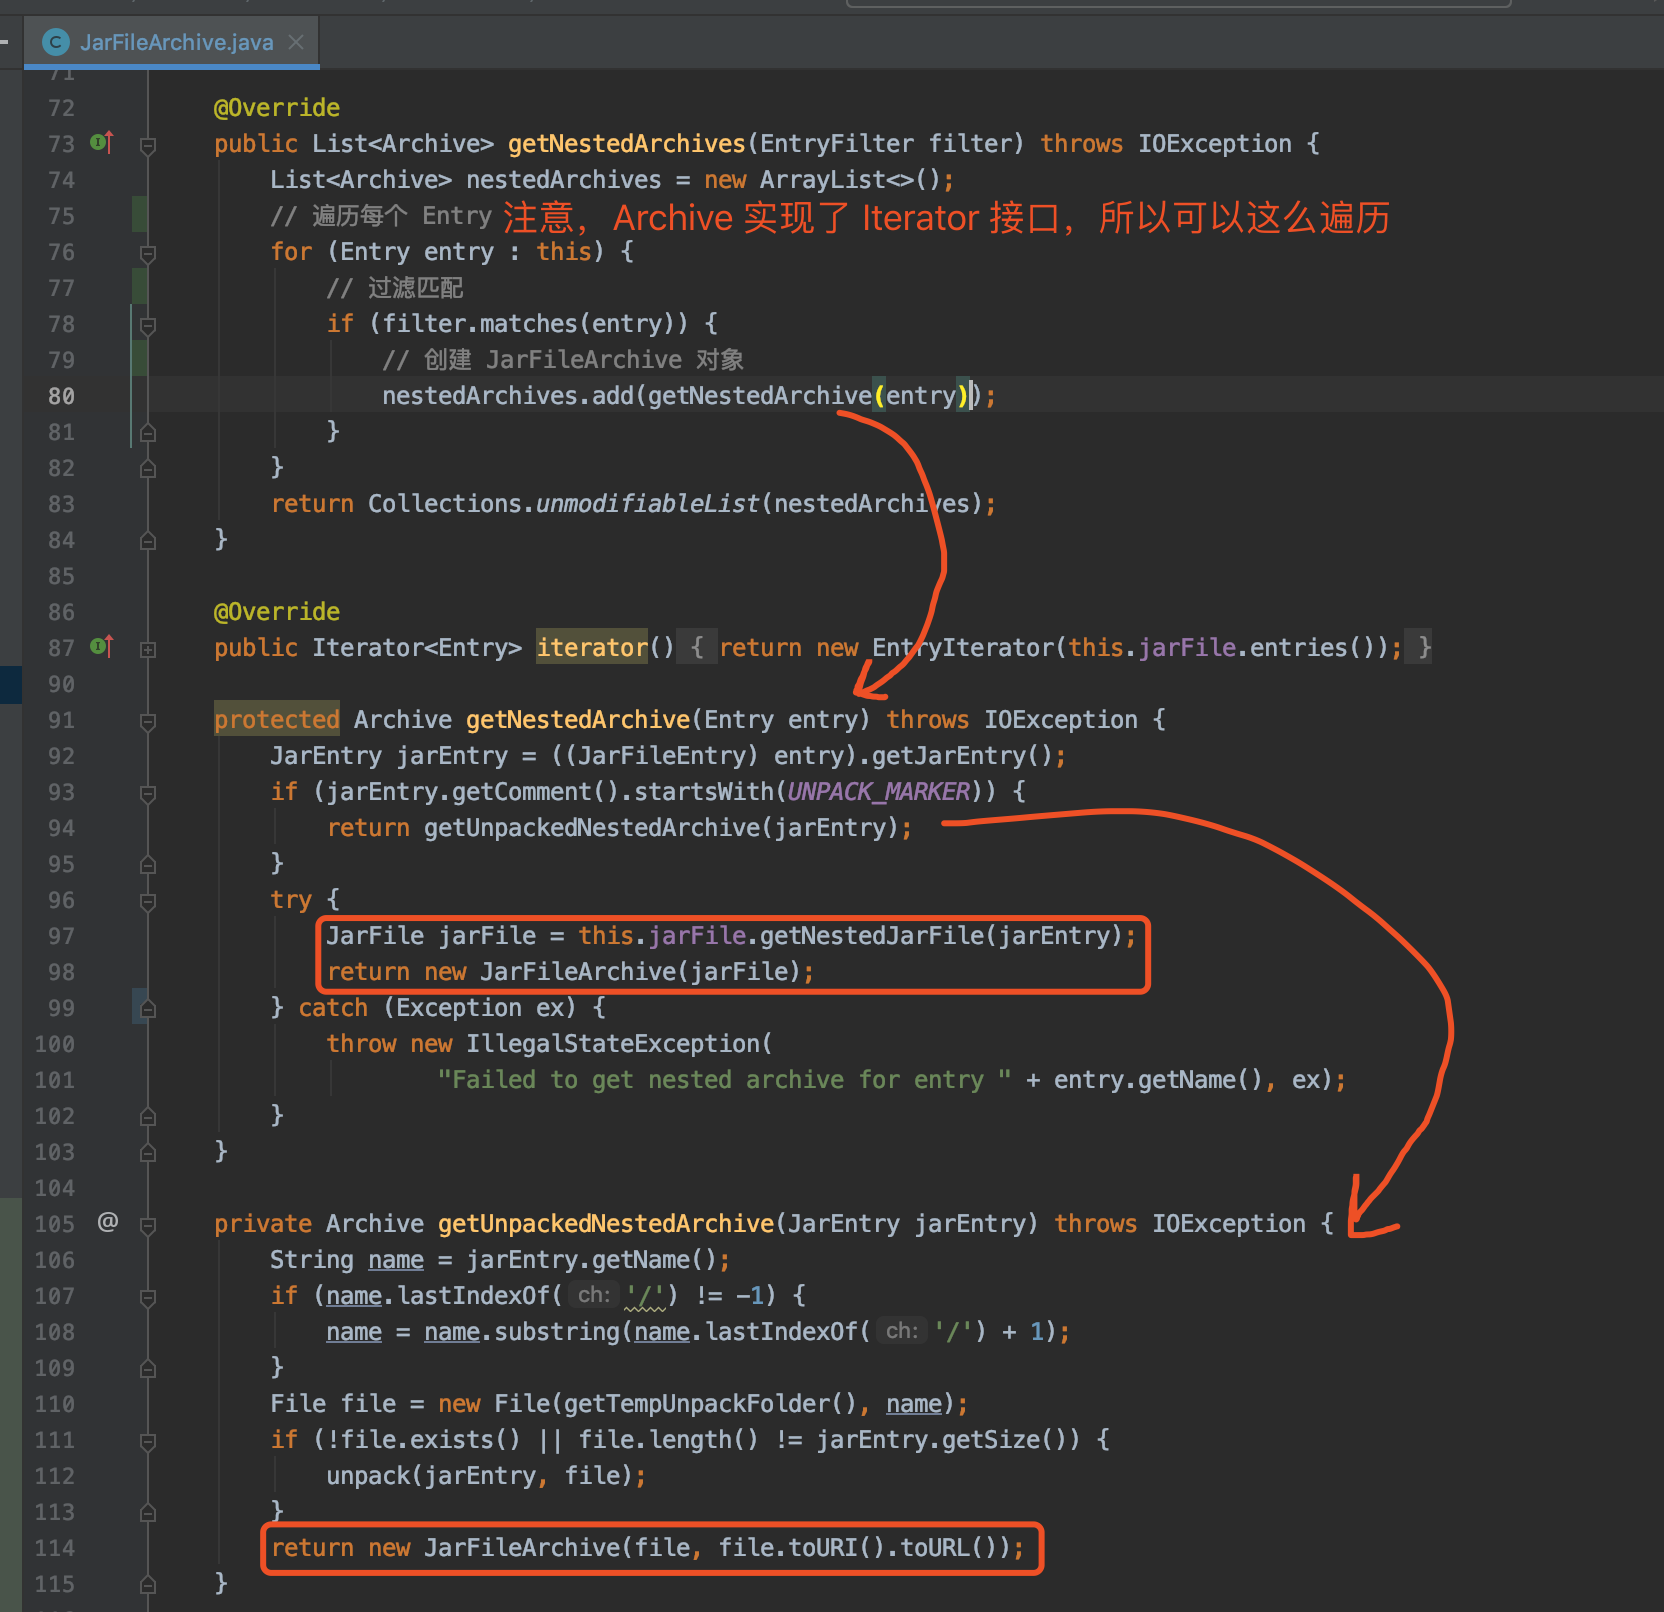](http://www.iocoder.cn/images/Spring-Boot/2019-01-07/16.png)JarFileArchive 的 `#getNestedArchives(EntryFilter filter)` 方法
|
||
|
||
现在是不是明白了噢!良心如我,哈哈哈!
|
||
|
||
> 友情提示:上述的测试代码,可以访问 [lab-39-demo](https://github.com/YunaiV/SpringBoot-Labs/tree/master/lab-39/lab-39-demo) 项目查看。
|
||
|
||
### 3.2.2 createClassLoader
|
||
|
||
然后,我再来看看 `#createClassLoader(List<Archive> archives)` 方法,它是由 ExecutableArchiveLauncher 所实现,代码如下:
|
||
|
||
```
|
||
// ExecutableArchiveLauncher.java
|
||
|
||
protected ClassLoader createClassLoader(List<Archive> archives) throws Exception {
|
||
// 获得所有 Archive 的 URL 地址
|
||
List<URL> urls = new ArrayList<>(archives.size());
|
||
for (Archive archive : archives) {
|
||
urls.add(archive.getUrl());
|
||
}
|
||
// 创建加载这些 URL 的 ClassLoader
|
||
return createClassLoader(urls.toArray(new URL[0]));
|
||
}
|
||
|
||
protected ClassLoader createClassLoader(URL[] urls) throws Exception {
|
||
return new LaunchedURLClassLoader(urls, getClass().getClassLoader());
|
||
}
|
||
```
|
||
|
||
基于获得的 Archive 数组,创建自定义 ClassLoader 实现类 [LaunchedURLClassLoader](https://github.com/spring-projects/spring-boot/blob/master/spring-boot-project/spring-boot-tools/spring-boot-loader/src/main/java/org/springframework/boot/loader/LaunchedURLClassLoader.java),通过它来加载 `BOOT-INF/classes` 目录下的类,以及 `BOOT-INF/lib` 目录下的 `jar` 包中的类。
|
||
|
||
进一步的解析,我们在[「5. LaunchedURLClassLoader」](https://svip.iocoder.cn/Spring-Boot/Jar/#)小节中,进行分享哈!
|
||
|
||
## 3.3 launch
|
||
|
||
> 友情提示:对应 `launch(args, getMainClass(), classLoader)` 代码段,不要迷路。
|
||
|
||
### 3.3.1 getMainClass
|
||
|
||
首先,我们先来看看`#getMainClass()` 方法,它是由 ExecutableArchiveLauncher 所实现,代码如下:
|
||
|
||
```
|
||
// ExecutableArchiveLauncher.java
|
||
|
||
@Override
|
||
protected String getMainClass() throws Exception {
|
||
// 获得启动的类的全名
|
||
Manifest manifest = this.archive.getManifest();
|
||
String mainClass = null;
|
||
if (manifest != null) {
|
||
mainClass = manifest.getMainAttributes().getValue("Start-Class");
|
||
}
|
||
if (mainClass == null) {
|
||
throw new IllegalStateException(
|
||
"No 'Start-Class' manifest entry specified in " + this);
|
||
}
|
||
return mainClass;
|
||
}
|
||
```
|
||
|
||
从 `jar` 包的 `MANIFEST.MF` 文件的 `Start-Class` 配置项,,获得我们设置的 Spring Boot 的**主**启动类。
|
||
|
||
### 3.3.2 createMainMethodRunner
|
||
|
||
然后,我们再来看看 `#launch()` 方法,它是由 Launcher 所实现,代码如下:
|
||
|
||
```
|
||
protected void launch(String[] args, String mainClass, ClassLoader classLoader)
|
||
throws Exception {
|
||
// <1> 设置 LaunchedURLClassLoader 作为类加载器
|
||
Thread.currentThread().setContextClassLoader(classLoader);
|
||
// <2> 创建 MainMethodRunner 对象,并执行 run 方法,启动 Spring Boot 应用
|
||
createMainMethodRunner(mainClass, args, classLoader).run();
|
||
}
|
||
```
|
||
|
||
该方法负责最终的 Spring Boot 应用真正的**启动**。
|
||
|
||
- `<1>` 处:设置[「3.2.2 createClassLoader」](https://svip.iocoder.cn/Spring-Boot/Jar/#)创建的 LaunchedURLClassLoader 作为类加载器,从而保证能够从 `jar` 加载到相应的类。
|
||
- `<2>` 处,调用 `#createMainMethodRunner(String mainClass, String[] args, ClassLoader classLoader)` 方法,创建 [MainMethodRunner](https://github.com/spring-projects/spring-boot/blob/master/spring-boot-project/spring-boot-tools/spring-boot-loader/src/main/java/org/springframework/boot/loader/MainMethodRunner.java) 对象,并执行其 `#run()` 方法来启动 Spring Boot 应用。
|
||
|
||
下面,我们来看看 **MainMethodRunner** 类,负责 Spring Boot 应用的启动。代码如下:
|
||
|
||
```
|
||
public class MainMethodRunner {
|
||
|
||
private final String mainClassName;
|
||
|
||
private final String[] args;
|
||
|
||
/**
|
||
* Create a new {@link MainMethodRunner} instance.
|
||
* @param mainClass the main class
|
||
* @param args incoming arguments
|
||
*/
|
||
public MainMethodRunner(String mainClass, String[] args) {
|
||
this.mainClassName = mainClass;
|
||
this.args = (args != null) ? args.clone() : null;
|
||
}
|
||
|
||
public void run() throws Exception {
|
||
// <1> 加载 Spring Boot
|
||
Class<?> mainClass = Thread.currentThread().getContextClassLoader().loadClass(this.mainClassName);
|
||
// <2> 反射调用 main 方法
|
||
Method mainMethod = mainClass.getDeclaredMethod("main", String[].class);
|
||
mainMethod.invoke(null, new Object[] { this.args });
|
||
}
|
||
|
||
}
|
||
```
|
||
|
||
- `<1>` 处:通过 LaunchedURLClassLoader 类加载器,加载到我们设置的 Spring Boot 的主启动类。
|
||
- `<2>` 处:通过**反射**调用主启动类的 `#main(String[] args)` 方法,启动 Spring Boot 应用。这里也告诉了我们答案,为什么我们通过编写一个带有 `#main(String[] args)` 方法的类,就能够启动 Spring Boot 应用。
|
||
|
||
# 4. LaunchedURLClassLoader
|
||
|
||
[LaunchedURLClassLoader](https://github.com/DarLiner/spring-boot/blob/master/spring-boot-project/spring-boot-tools/spring-boot-loader/src/main/java/org/springframework/boot/loader/LaunchedURLClassLoader.java) 是 `spring-boot-loader` 项目自定义的**类加载器**,实现对 `jar` 包中 `META-INF/classes` 目录下的**类**和 `META-INF/lib` 内嵌的 `jar` 包中的**类**的**加载**。
|
||
|
||
> FROM [《维基百科 —— Java 类加载器》](https://zh.wikipedia.org/wiki/Java类加载器)
|
||
>
|
||
> Java 类加载器是 Java 运行时环境的一个部件,负责动态加载 Java 类到 Java 虚拟机的内存空间中。类通常是按需加载,即第一次使用该类时才加载。
|
||
>
|
||
> 由于有了类加载器,Java 运行时系统不需要知道文件与文件系统。对学习类加载器而言,掌握 Java 的委派概念是很重要的。每个 Java 类必须由某个类加载器装入到内存。
|
||
|
||
在[「3.2.2 createClassLoader」](https://svip.iocoder.cn/Spring-Boot/Jar/#)小节中,我们可以看到 LaunchedURLClassLoader 的创建代码如下:
|
||
|
||
```
|
||
// ExecutableArchiveLauncher.java
|
||
|
||
protected ClassLoader createClassLoader(List<Archive> archives) throws Exception {
|
||
// 获得所有 Archive 的 URL 地址
|
||
List<URL> urls = new ArrayList<>(archives.size());
|
||
for (Archive archive : archives) {
|
||
urls.add(archive.getUrl());
|
||
}
|
||
// 创建加载这些 URL 的 ClassLoader
|
||
return createClassLoader(urls.toArray(new URL[0]));
|
||
}
|
||
|
||
protected ClassLoader createClassLoader(URL[] urls) throws Exception {
|
||
return new LaunchedURLClassLoader(urls, getClass().getClassLoader());
|
||
}
|
||
|
||
// LaunchedURLClassLoader.java
|
||
|
||
public class LaunchedURLClassLoader extends URLClassLoader {
|
||
|
||
public LaunchedURLClassLoader(URL[] urls, ClassLoader parent) {
|
||
super(urls, parent);
|
||
}
|
||
|
||
}
|
||
```
|
||
|
||
- 第一个参数 `urls`,使用的是 Archive 集合对应的 URL 地址们,从而告诉 LaunchedURLClassLoader 读取 `jar` 的**地址**。
|
||
- 第二个参数 `parent`,设置 LaunchedURLClassLoader 的**父**加载器。这里后续胖友可以理解下,类加载器的**双亲委派模型**,这里就拓展开了。
|
||
|
||
LaunchedURLClassLoader 的实现代码并不多,我们主要来看看它是如何从 `jar` 包中加载类的。核心如下图所示:
|
||
|
||
[](http://www.iocoder.cn/images/Spring-Boot/2019-01-07/21.png)
|
||
|
||
- `<1>` 处,在通过**父类**的 `#getPackage(String name)` 方法获取不到指定类所在的包时,**会通过遍历 `urls` 数组,从 `jar` 包中加载类所在的包**。当找到包时,会调用 `#definePackage(String name, Manifest man, URL url)` 方法,设置包所在的 **Archive** 对应的 `url`。
|
||
- `<2>` 处,调用**父类**的 `#loadClass(String name, boolean resolve)` 方法,加载对应的类。
|
||
|
||
如此,我们就实现了通过 LaunchedURLClassLoader 加载 `jar` 包中内嵌的类。
|
||
|
||
# 666. 彩蛋
|
||
|
||
总体来说,Spring Boot `jar` 启动的原理是非常清晰的,整体如下图所示:
|
||
|
||
[](http://www.iocoder.cn/images/Spring-Boot/2019-01-07/30.png)Spring Boot `jar` 启动原理
|
||
|
||
**红色**部分,解决 `jar` 包中的**类加载**问题:
|
||
|
||
- 通过 [Archive](https://github.com/spring-projects/spring-boot/blob/master/spring-boot-project/spring-boot-tools/spring-boot-loader/src/main/java/org/springframework/boot/loader/archive/Archive.java),实现 `jar` 包的**遍历**,将 `META-INF/classes` 目录和 `META-INF/lib` 的每一个内嵌的 `jar` 解析成一个 Archive 对象。
|
||
- 通过 [Handler](https://github.com/spring-projects/spring-boot/blob/master/spring-boot-project/spring-boot-tools/spring-boot-loader/src/main/java/org/springframework/boot/loader/jar/Handler.java),处理 `jar:` 协议的 URL 的资源**读取**,也就是读取了每个 Archive 里的内容。
|
||
- 通过 [LaunchedURLClassLoader](https://github.com/spring-projects/spring-boot/blob/master/spring-boot-project/spring-boot-tools/spring-boot-loader/src/main/java/org/springframework/boot/loader/LaunchedURLClassLoader.java),实现 `META-INF/classes` 目录下的类和 `META-INF/classes` 目录下内嵌的 `jar` 包中的类的加载。具体的 URL 来源,是通过 Archive 提供;具体 URL 的读取,是通过 Handler 提供。
|
||
|
||
**橘色**部分,解决 Spring Boot 应用的**启动**问题:
|
||
|
||
- 通过 [MainMethodRunner](https://github.com/spring-projects/spring-boot/blob/master/spring-boot-project/spring-boot-tools/spring-boot-loader/src/main/java/org/springframework/boot/loader/MainMethodRunner.java) ,实现 Spring Boot 应用的启动类的执行。
|
||
|
||
当然,上述的一切都是通过 [Launcher](https://github.com/spring-projects/spring-boot/blob/master/spring-boot-project/spring-boot-tools/spring-boot-loader/src/main/java/org/springframework/boot/loader/Launcher.java) 来完成引导和启动,通过 `MANIFEST.MF` 进行具体配置。
|
||
|
||
😈 生活如此美好,本文就此结束!
|
||
|
||
------
|
||
|
||
另外,本文有两个部分,胖友可以自己再去撸一撸,玩一玩:
|
||
|
||
- [WarLauncher](https://github.com/spring-projects/spring-boot/blob/master/spring-boot-project/spring-boot-tools/spring-boot-loader/src/main/java/org/springframework/boot/loader/WarLauncher.java) 类:实现 Spring Boot `war` 包的启动。
|
||
- [`org.springframework.boot.loader.jar`](https://github.com/spring-projects/spring-boot/blob/master/spring-boot-project/spring-boot-tools/spring-boot-loader/src/main/java/org/springframework/boot/loader/jar/) 包:具体读取 `jar` 的逻辑。 |